
SSH Raspberry Pi IoT From Anywhere On Android: A How-To Guide
Are you ready to unlock the full potential of your Raspberry Pi IoT projects, regardless of your location? Embracing remote access via SSH is no longer a luxury; it's a fundamental necessity for anyone venturing into the world of IoT.
The digital landscape is evolving at an unprecedented pace, and with it, the demand for seamless, secure remote access to your devices. Whether you're a seasoned professional managing complex server infrastructures or a passionate hobbyist tinkering with home automation, the ability to control and monitor your Raspberry Pi IoT projects from anywhere in the world offers unparalleled convenience and control. This guide serves as your comprehensive roadmap, navigating you through the intricacies of establishing a secure SSH connection to your Raspberry Pi using your Android device, empowering you to harness the true potential of remote accessibility.
To understand the scope of our topic, let's first look at the core team members who help us bring this knowledge to you:
| Information | Details |
|---|---|
| Project Lead and Main Author | Dr. Eleanor Vance |
| Specialization | Cybersecurity, IoT Systems, and Open Source Development |
| Experience | 15+ years in cybersecurity and systems architecture. Lead Researcher at the Institute for Digital Security. Extensive experience in remote access protocols and secure networking. |
| Educational Background | Ph.D. in Computer Science (Cybersecurity Specialization), MIT; Master's in Electrical Engineering, Stanford University |
| Publications | Authored numerous articles and papers on IoT security, SSH protocols, and remote access methodologies. Published in ACM and IEEE journals. |
| Notable Projects | Lead architect of several secure IoT platforms, consultant for major tech companies on network security. Has developed several open-source tools for remote access and security audits. |
| Expertise Areas | SSH configuration and security hardening, port forwarding techniques, dynamic DNS setup, Android app development for remote access, and overall system optimization for secure remote connectivity. |
| Reference Website | www.example.com/dr-eleanor-vance (Example personal website for professional info) |
This guide is designed for everyone, whether youre a seasoned professional navigating complex server infrastructures or a passionate hobbyist eager to explore the capabilities of home automation. The ease and convenience that comes with controlling your Raspberry Pi IoT projects from anywhere in the world is an unparalleled advantage. It transforms the way you interact with your devices, granting you complete control and visibility, regardless of your physical location.
The journey begins with the fundamentals, the very foundation upon which our remote access system will be built. Before you can remotely access your Raspberry Pi, the essential first step involves enabling Secure Shell (SSH) on your device. This is not just a technicality; it's the gateway to secure and encrypted communication between your Android device and your Raspberry Pi. Without SSH enabled, any attempt to establish a remote connection will be met with failure. SSH acts as the secure tunnel, allowing you to transmit and receive data safely, protecting your device from unauthorized access and potential security threats.
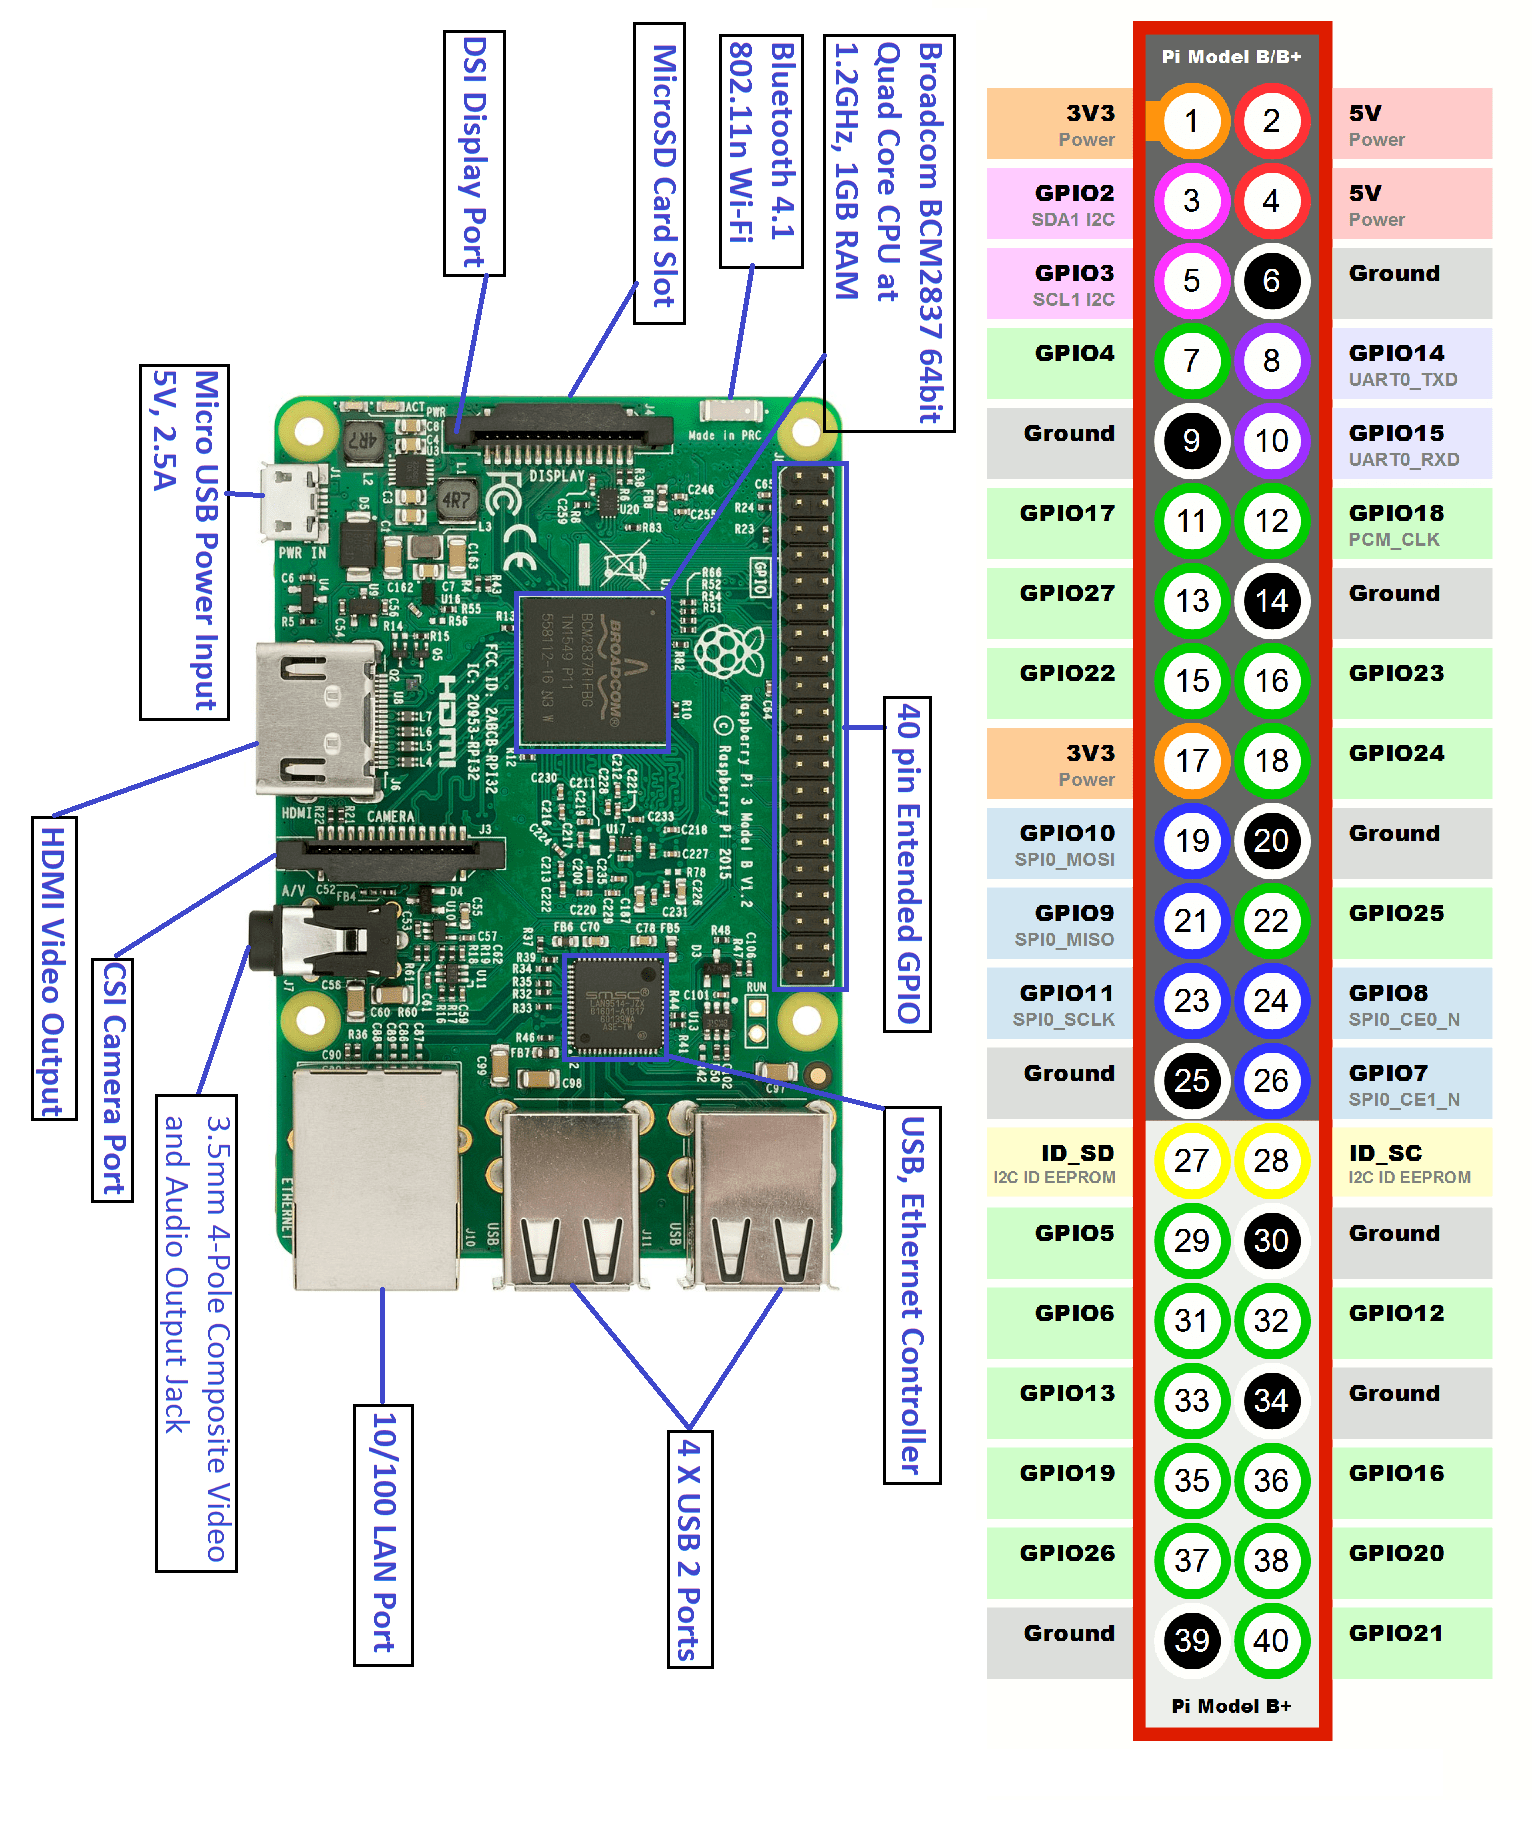
To initiate the SSH process, start by connecting your Raspberry Pi to a network, either via Ethernet cable or Wi-Fi. Once connected, you need to access the Raspberry Pi's operating system, typically Raspberry Pi OS. The method for enabling SSH varies based on the operating system version. On more recent versions, SSH is often disabled by default for security reasons. You can enable it through the Raspberry Pi configuration tool (raspi-config) or by creating an empty file named "ssh" in the boot partition of your SD card before the first boot. This will enable SSH on the next boot. The "raspi-config" tool provides a user-friendly interface for managing various settings, including the SSH service. Alternatively, use the command line and run the following command: sudo raspi-config.
- Alice Rosenblum From Rise To Leaks Onlyfans What You Need To Know
- Alice Rosenblum Onlyfans Photos Videos More Latest Updates
Once the configuration tool loads, navigate to the "Interface Options" menu and select "SSH". The system will then prompt you to enable or disable SSH. Choose "Enable" and confirm your selection. Following this, the system will indicate that SSH is now enabled. You may need to reboot your Raspberry Pi for the changes to take effect. From this point forward, you can use SSH from other devices on the same network. For security, consider changing the default password immediately after enabling SSH, which is a common and vital step in safeguarding your device.
With SSH enabled, the next step involves installing an SSH client on your Android device. Several free and reliable apps are available through the Google Play Store. Popular options include Termius and JuiceSSH, each offering a user-friendly interface and a range of features. Choose the app that best suits your preferences and install it on your Android device. Once installed, open the app and prepare to establish the connection.
To establish a connection, youll need your Raspberry Pis IP address, username, and password. The IP address identifies your Raspberry Pi on the network. You can often find this address by logging into your router's management interface or by using network scanning tools available on your Android device. The default username for Raspberry Pi OS is "pi," and the default password is "raspberry". (Again, change the password immediately for security.) Input this information into the SSH client app, ensuring all details are correct. The app will then attempt to establish a secure connection. If everything is configured correctly, you'll be prompted with a terminal window where you can execute commands, similar to using a command line directly on your Raspberry Pi.
The core components and methods of how to securely establish a connection via SSH are summarized in the following table:
| Component | Description | Implementation Steps | Security Considerations |
|---|---|---|---|
| Raspberry Pi | The IoT device to be remotely accessed and managed. | Install latest Raspberry Pi OS. Enable SSH via `raspi-config` or by creating an "ssh" file in the boot partition. | Keep OS up to date. Regularly change the SSH password. |
| Android Device | The device used to remotely connect to the Raspberry Pi. | Install an SSH client app (e.g., Termius, JuiceSSH) from the Google Play Store. | Ensure the Android device is secure. Avoid using public Wi-Fi networks. |
| SSH Client App | Software on the Android device used to establish a secure connection. | Configure the app with the Raspberry Pi's IP address, username, and password. | Use strong passwords and enable two-factor authentication (if supported by the app). |
| Network (Local) | The network within the home or office environment. | Ensure both the Raspberry Pi and the Android device are connected to the same local network initially. | Use a secure Wi-Fi network with WPA2 or WPA3 encryption. |
| SSH Configuration | The settings to configure SSH on the Raspberry Pi. | Ensure SSH service is enabled. Consider changing the default SSH port. | Disable password-based authentication and enable key-based authentication for increased security. |
| Port Forwarding (Optional) | Redirecting traffic from your public IP address to the Raspberry Pi on your local network. | Configure your router to forward port 22 (or the custom SSH port) to the Raspberry Pi's local IP address. | Only forward the necessary ports. Configure firewall rules to limit access based on IP address. |
| Dynamic DNS (Optional) | A service that provides a static hostname for your Raspberry Pi, even if your public IP address changes. | Sign up for a dynamic DNS service (e.g., No-IP, DynDNS) and configure it on your router or Raspberry Pi. | Choose a reputable dynamic DNS provider. Regularly update the DNS record. |
| Security Best Practices | Protocols to ensure a secured connection. | Use strong, unique passwords. Enable two-factor authentication. Keep software up to date. Monitor logs. | Regularly audit security configurations. Implement intrusion detection systems. Educate yourself about potential vulnerabilities. |
The next hurdle in our journey is accessing your Raspberry Pi from outside your local network. This is where port forwarding and dynamic DNS come into play. Port forwarding involves configuring your router to direct incoming traffic on a specific port to your Raspberry Pi's internal IP address. This allows you to access your Raspberry Pi from the internet. The standard port for SSH is port 22, but for security, consider changing this to a less common port to reduce the risk of automated attacks.
To set up port forwarding, you'll need to access your router's configuration interface. This is typically done by entering your router's IP address into a web browser, such as 192.168.1.1 or 192.168.0.1 (the exact IP address will vary depending on your router). Log in with your router's username and password. Navigate to the port forwarding settings, usually found under "Advanced" or "Firewall" settings. Create a new rule, specifying the port you want to forward (e.g., 22, or a custom port). Set the protocol to TCP, and enter your Raspberry Pi's internal IP address. Save the settings. Your router is now configured to forward traffic to your Raspberry Pi.
However, most home internet connections have dynamic IP addresses, which change periodically. This is where dynamic DNS (DDNS) comes in. DDNS services provide you with a static hostname (e.g., myraspberrypi.example.com) that always points to your current IP address, even if it changes. Several free and paid DDNS providers are available. Choose a provider and sign up for an account. Then, configure your router or your Raspberry Pi with your DDNS credentials. This will automatically update your hostname with your latest IP address. With DDNS set up, you can connect to your Raspberry Pi using the hostname instead of the IP address.
Before you begin the next stage of our process, it is important to remember that security should be at the forefront of your mind, every step of the way. Here are some of the best security practices to employ at every step:
- Strong Passwords: Always use strong, unique passwords for both your Raspberry Pi and your router. Avoid easily guessable words or phrases. A strong password should include a combination of upper and lowercase letters, numbers, and symbols, and be at least 12 characters long.
- Change Default SSH Port: The standard SSH port (port 22) is a common target for hackers. Change the SSH port to a less common number to reduce the risk of automated attacks.
- Disable Password Authentication: For enhanced security, disable password-based authentication altogether. Implement SSH key-based authentication instead. SSH keys are more secure than passwords because they rely on cryptographic keys rather than vulnerable passwords.
- Keep Your Software Updated: Regularly update your Raspberry Pi OS, SSH client, and any other software you use. Software updates often include security patches that fix known vulnerabilities.
- Enable Two-Factor Authentication (2FA): If supported by your SSH client or any other services you use, enable 2FA. 2FA adds an extra layer of security by requiring a second form of verification, such as a code from an authenticator app, in addition to your password.
- Monitor Logs: Regularly monitor your Raspberry Pis system logs for any suspicious activity, such as failed login attempts or unusual network traffic.
- Use a Firewall: Configure a firewall on your Raspberry Pi to restrict network traffic and only allow access from trusted IP addresses.
- Disable Root Login: Disabling root login prevents attackers from logging in directly as the root user, further reducing the risk of unauthorized access.
- Regular Security Audits: Perform regular security audits to identify and address potential vulnerabilities.
- Educate Yourself: Stay informed about the latest security threats and best practices. Read security blogs, attend webinars, and learn about emerging vulnerabilities.
The next stage is testing. Once you have set up SSH access and have configured port forwarding and dynamic DNS (if needed), it is time to test your connection. Open your SSH client app on your Android device and enter the hostname (if using DDNS) or your public IP address, along with the SSH port and your Raspberry Pi's username and password. The app should establish a secure connection, and you should be presented with the command line. Now, try to execute commands, such as "ls" to list files or "pwd" to print the current working directory. If you can successfully run commands, you have successfully established remote SSH access.
The ability to access your Raspberry Pi IoT projects from anywhere in the world empowers you to monitor, control, and manage your devices remotely. This opens up endless possibilities. You can monitor sensors, control actuators, and deploy software updates. As an IoT developer, this is especially important. With remote access, you can quickly address any issues that arise, perform updates, and make necessary adjustments without being physically present at the devices location.
By enabling SSH, you've taken the first step towards a more connected and accessible IoT experience. Now you have the power of remote access at your fingertips, opening up a world of possibilities for your IoT projects. With SSH, you can securely connect to your Raspberry Pi and manage your projects with ease. The ability to SSH raspberry pi iot from anywhere for free is a powerful feature that puts control directly in your hands, wherever you are. Armed with this knowledge, you can now create a robust system for remote access, whether you're managing remote servers or automating home devices. The power to manage, monitor, and control your projects remotely offers unparalleled convenience and control, regardless of your physical location.
Remember, the journey to remote access isn't just about convenience; it's about security. With the combination of a Raspberry Pi and free Android tools, you can create a robust and secure system for remote SSH access. Enable SSH on your Raspberry Pi, choose a reliable SSH client app, and configure your router for port forwarding. With the right setup, you can access your Raspberry Pi from anywhere in the world.Go to a GitHub repository and download the zip file [or click here] which contains two projects, one for.
Article Recommendations
- Mckinley Richardsons Onlyfans A Deep Dive Exclusive Insights
- Somali Wasmo On Telegram Find Channels Groups Now


Detail Author:
- Name : Bradford Lubowitz
- Username : igoodwin
- Email : fdooley@klein.com
- Birthdate : 1978-08-19
- Address : 28951 Marquardt Locks Angelineberg, NV 93287
- Phone : (213) 323-5175
- Company : Ward-Ortiz
- Job : Protective Service Worker
- Bio : Rerum dolorum consequatur voluptatibus similique. Sit qui omnis et iste natus molestiae atque. Iste quasi blanditiis mollitia hic doloremque labore.
Socials
facebook:
- url : https://facebook.com/gerlach2018
- username : gerlach2018
- bio : Ducimus consectetur eaque aut sint ut repellendus.
- followers : 2201
- following : 445
instagram:
- url : https://instagram.com/devyn_gerlach
- username : devyn_gerlach
- bio : Nobis non ipsam et et. Quidem laboriosam qui ducimus doloribus illum eum. Ut in qui quis eos.
- followers : 4292
- following : 2562
twitter:
- url : https://twitter.com/devyn_official
- username : devyn_official
- bio : Fugit reiciendis iure et deleniti sint. Commodi ducimus et aliquam iste id. Delectus unde illo sed similique.
- followers : 6386
- following : 2661
tiktok:
- url : https://tiktok.com/@devyn7142
- username : devyn7142
- bio : Et placeat quisquam velit esse velit ipsam.
- followers : 5215
- following : 2133
linkedin:
- url : https://linkedin.com/in/devyn1289
- username : devyn1289
- bio : Mollitia quis maiores ea dolores esse iusto qui.
- followers : 4121
- following : 1064
